What is Cacti
Cacti is a popular Web-based tool for generating graphs of various data/statistics from remote servers. It provides default "templates" for generating graphs of CPU load, processes, memory, etc out-of-the-box, mainly retrieving these data from remote machines via
SNMP (Simple Network Management Protocol). Cacti can be set up to graph custom data, again using SNMP by default. In fact, most of the instructions available online assume that Cacti talks SNMP to remote machines.
This blog is based on Cacti version
0.8.7d, running on a Linux machine.
The problem with SNMP
However, I find SNMP to be
very complicated to set up for anything more complex than a single value data. Personally, I find SNMP to be overkill and far too difficult to manage, especially when it comes to setting up a custom SNMP table to group data in a way that can be traversed by Cacti.
Alternative to SNMP
This blog shows how Cacti can be used to retrieve data, via HTTP, from a URL that points to a "Web service" (not the heavy SOAP kind) that returns data in a simple text format. This can be implemented using JSP, PHP, a simple Java servlet or just any Web technology. All it needs to do is to return in its response the data in the following textual format:
fieldName1:fieldValue1 fieldName2:fieldValue2 fieldName3:fieldValue3 ... Example
Lets assume I'm hosting a Java Web application, and I want to graph the following:
- The number of requests that generated successful responses.
- The number of requests that generated errors.
Two things are required on the Java application side:
- Some sort of filter/interceptor to capture these two types of request.
- A servlet to count the number of these requests and return a response in the desired format. This servlet will reset its counters after sending each response, so that each time it returns the count since the last response. The response content type is set to
text/plain and the content looks something like:
successCount:1623 errorCount:23This servlet is deployed on the same Web container as the main Web application, and mapped to the URL:
http://remoteserver:8080/myapp/statisticsCacti Configuration
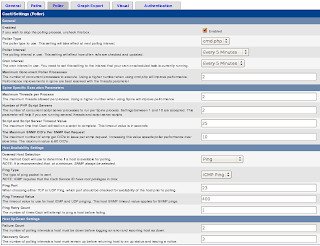
Poller Settings
Firstly, tell Cacti to simply use Ping to detect hosts for polling. Click on
Settings on the left bar, then click on the
Poller tab and change
Downed Host Detection to just
Ping, as shown below:
Device
After that, set up a device to point to the server that is hosting the Web application. Assume it is reachable by name
remoteserver. Create a device of type
None as shown below, meaning Cacti will use ping to detect the server.
 Note:
Note: This version of Cacti has a bug (at least on my Firefox browser) where it tries to validate that the
SNMP Version 3 passwords match even when SNMP is set to
Not In Use. To work around this, first select
SNMP Version 3, blank out both passwords, then select
Not In Use.
Data Input Method
A Data Input Method is set up to tell Cacti to retrieve the data from the servlet (using wget), and map the field names in the response text to fields that Cacti understands. Refer to screenshot below:
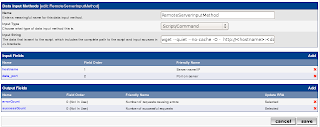
Name this Data Input Method as
RemoteServerInputMethod. Select
Script/Command as the
Input Type, and type the following in the
Input String :
wget --quiet --no-cache -O - http://<hostname>:<data_port>/myapp/statisticsCreate
hostname and
data_port input fields, that are used to pass in values to the <hostname> and <data_port> parameters in the script command.
Create
successCount and
errorCount output fields, that are mapped to the field names in the response text. Make sure these output field names exactly match those in the servlet response text.
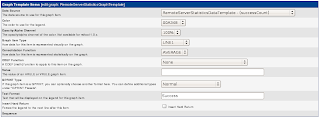
Data Template
The Data Input Method is used to create a Data Template, as shown below:
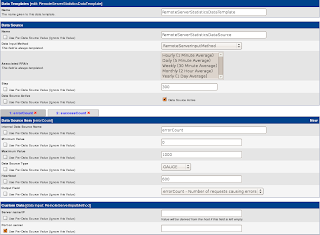
Name this Data Template as
RemoteServerStatisticsDataTemplate. Name the
Data Source as
RemoteServerStatisticsDataSource, this will automatically become the data source name (see later).
Create a Data Source Item to map to each of the data fields, i.e.
successCount and
errorCount. Most of the settings here can stick to the defaults. The important part is to make sure that the
Output Field selectors are mapped to the correct fields.
Its better to tick the checkbox under the
Port on server Custom Data to tell Cacti to assign the port from the data source, so that we don't have to hardcode 8080 in the Data Template.
Data Source
Create a Data Source that connects the Data Template with the Host Device that were configured earlier. Select appropriate options for these two drop-down selectors. Do not change the
Data Source Path. Enter
8080 as the
Port on server.
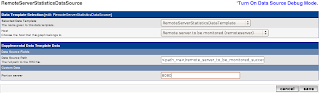
This screen creates a Data Source that automatically gets the name as specified in the Data Template screen before.
Graph Template
Set up a Graph Template to tell Cacti how to plot the data in the graph. Name it
RemoteServerStatisticsGraphTemplate, and give the graph a descriptive
Title. All other fields below the
Title can be left in their default values. Create two
Graph Template Items as shown in the screenshot below.
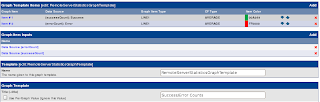
Note that creating a
Graph Template Item will automatically create a corresponding
Graph Item Input.
The screenshot below shows the screen for creating a Graph Template Item. Simply choose the matching
Data Source for the field, and enter a descriptive
Text Format.
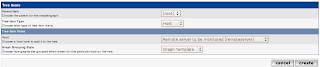
Graph Management
Enter Graph Management to create an association between Graph Template, Host Device and the Data Sources. The screenshot below should be self-explanatory.

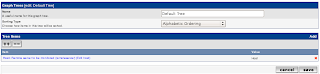
Graph Tree
Finally, enter Graph Tree to place the graph in the hierarchical tree. This is quite straightforward. Create a Tree Item of type
Host, and point it to the Host.
The new Tree Item will appear like so in the Graph Tree:
DONE!
Finally, its all done. Just click on the Graph tab, drill down the tree and see the graph of successful and error request counts.


